Moderation on Discord Server Using AutoMod: A Complete Guide
Written by: Hrishikesh Pardeshi, Founder at Flexiple, buildd & Remote Tools.
Last updated: Sep 03, 2024
Recently, Discord introduced a new moderation tool that can allow you to enable moderation on your Discord server. This tool is called AutoMod and you can use it to prevent unwanted messages from occurring on your Discord server. Setting up this tool in your server can help you in creating a safe space for your members.
Automod offers you access to different content filters that allow you automatically detect and block risky and undesirable content before they get posted on your server. Read through this article to discover how to get and set up AutoMod on your community server.
TLDR
Follow these steps to set up Automod on your Discord server:
Go to your Server Settings.
Under the Community category, click on Enable Community.
At the page that appears next, click on Get Started. Follow the steps on the next window to set up your community server.
After completing the above step, go to the Moderation tab in your server settings and click on AutoMod.
You can now set up filters to moderate your server and automate a custom response for them.
Table of Contents
How To Set Up Automod on Discord Servers
You can follow the step to enable the AutoMod setting on your Discord server:
Step 1: Go to Your Server Settings
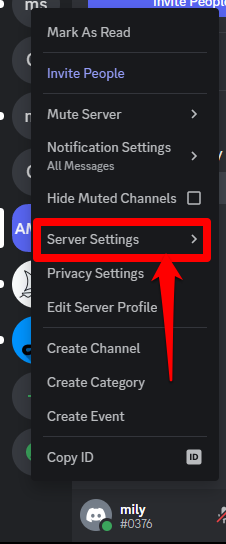
Login to your Discord account and right-click on the server you want to set up. On the drop-down menu that appears next, select Server Settings.
Step 2: Locate the Community Management Section
Once you are on your server setting page, locate the Community tab at the left of your screen. Click on Enable Community.

On the page that appears next, click on the Get Started button in the middle of your screen to activate your community settings.

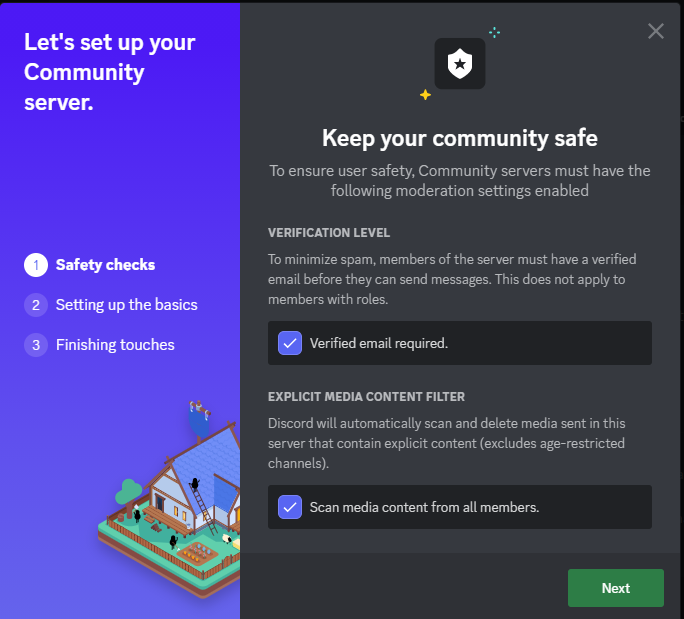
A window will appear that guides you through the steps for activating your server. The first step is the safety checks. Click on the boxes beside the Verified email required and Scan media content from all members option. Click on Next after checking the boxes.
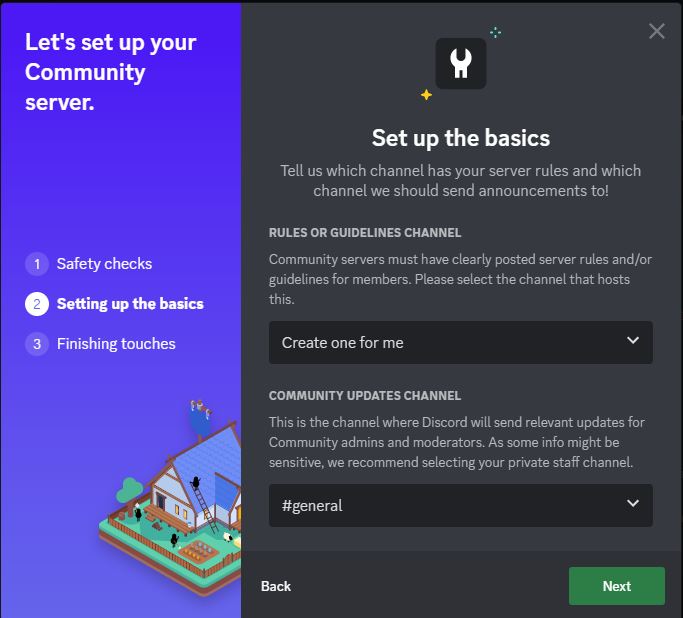
The next step involves you setting up the basics. There, you have the opportunity to create a server rules and community updates channel. You can let Discord do it for you by choosing the Create one for me option or creating your own rules by selecting #general. Then, click Next.
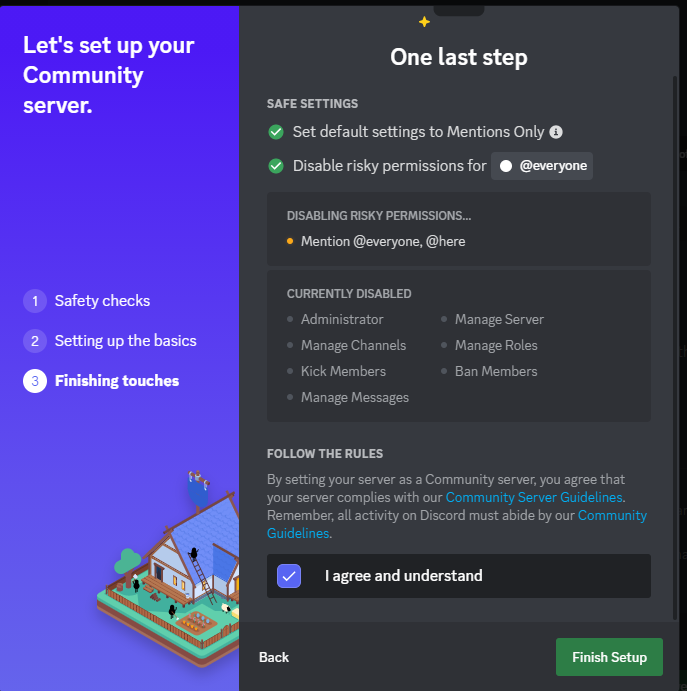
For the final step, you're just adding the finishing touches. Check the box beside the I agree and understand tab and click on Finish Setup.
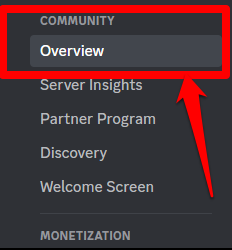
Once you're done with this setup, you will see an Overview tab under the Community category.
There, you can choose your rules or guidelines channel, community updates channel, and the server's primary language. You can also decide to include a server description that describes your community.
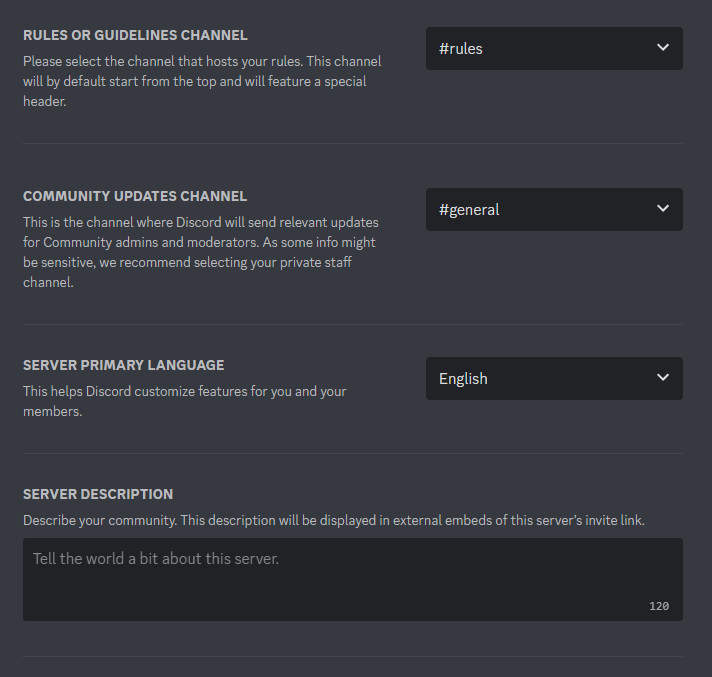
Click on Save Changes when you're done with this.
Step 3: Click on Automod
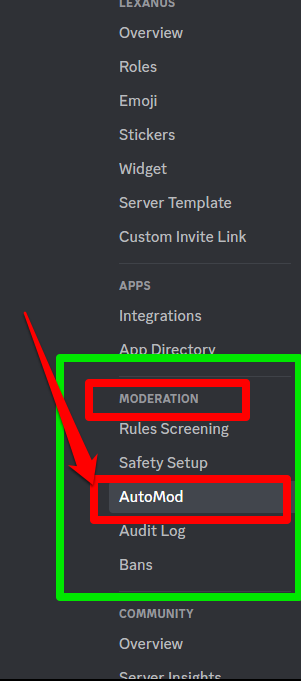
Once you're done with setting up your community, locate the AutoMod button under the Moderation category in your Server Settings.
This will lead you to a page where you can set up or create filters to manage your server contents and create custom rules for when flagged messages are sent to the server. You have the option of setting up the following options:
Block mention spam
Block spam content
Commonly flagged words
Custom keyword rule
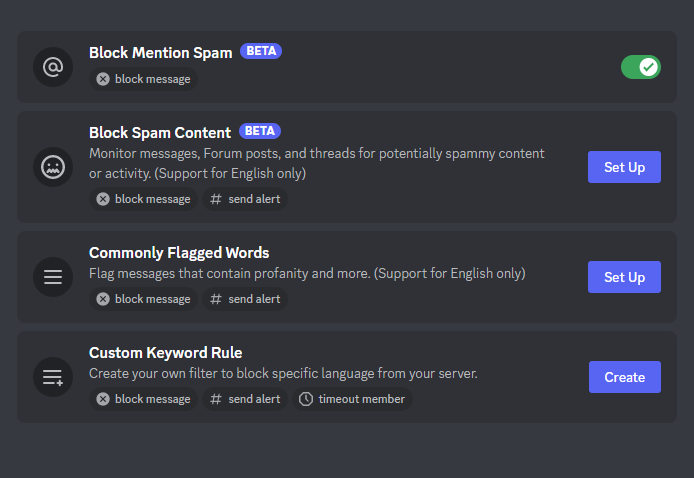
Setting up any of the above options can help you in content moderation by helping you to custom keyword and spam filters. AutoMod can work for text channels and text chat and threads in voice channels.
Click on Save Changes when you're done with your settings.
What Are Spam Filters?
Massive online communities tend to encounter spam messages from destructive users. AutoMod's spam filter helps to keep you managing your community by using two different filters that can automatically detect a message that contains spammy text and block them before they get posted to the server. It will detect these messages in text chats and threads in voice channels and text channels.
The first filter is the Block Mention Spam filter. This filter sets a limit on the number of mentions that can be allowed in a message. Once you enable this filter, AutoMod can automatically detect and prevent messages that exceed your server limits. It also prevents your server members from getting irrelevant notifications.
The second filter is the Block Spam Content filter. This filter detects unwanted messages containing spammy texts in text channels or during a text chat.
How To Set up Spam Filters for Discord Automod
To set up your spam filters, go to your Server Settings and click on AutoMod to access the following options:
Step 1: Select the Block Mention Spam Filter
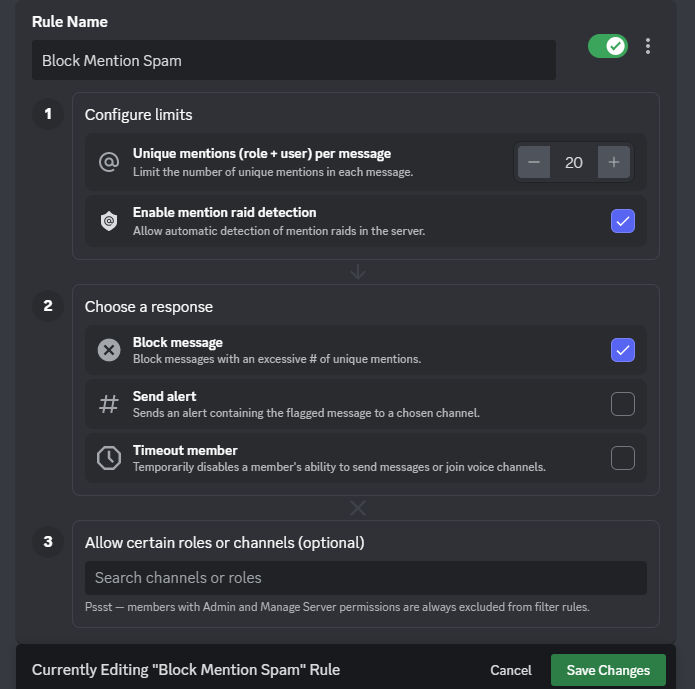
Toggle on the switch beside the option and click on the three dots beside the switch to view the response actions. Click on Edit Rule on the drop-down menu that appears.

On the menu that appears, you can set up your configure limits by specifying the number of unique mentions per message. You can also enable the automatic detection of mentions in the server by checking off the box next to the Enable mention raid detection option.
Next, you can choose a response. Choose to have AutoMod block the message, send you alerts in the text channel of your choice, and/or timeout users when they send a message that contains excessive mentions.
Finally, you can add roles or channels that you don't want AutoMod to flag messages containing excessive mentions. Note that this section is optional. Click on Save Changes once you're done with this step.
Step 2: Click on the Block Spam Content Filter
Click on Set Up to view the different response actions for setting up this filter.

On the menu that appears, you can allow AutoMod to block the messages and/or send you alerts in the text channel of your choice.
You can also add exempt channels or roles that you don't want AutoMod to block for suspected spam messages. Note that this section is optional. Click on Save Changes once you're done setting up this filter.
What Are Keyword Filters?
Automod's custom keyword filters allow you to set up rules to determine what words AutoMod should watch out for and how this tool can respond to a flagged message. This filter has two tools that you can set up to manage your content.
The first filter is the Commonly Flagged Words filter. This filter uses a ready-made word list to filter and ban commonly flagged words.
The second filter is the Custom Keyword Rule filter. This option allows you to create your own keywords and terms that you want to ban other users from typing on your server.
How To Set Up Keyword Filters for Discord Automod
To set up your keyword filters, go to your Server Settings and click on AutoMod to access the following options:
Step 1: Click on Commonly Flagged Words
Besides the commonly flagged words option, click on Set Up to access the settings.

Select from the three ready-made word lists on the menu that appears next. The word list includes the following:
Severe Profanity: This includes words or phrases that contain extreme forms of cursing and swearing. It helps in dealing with horrible forms of profanity while allowing mild forms of swearing and cursing.
Insults and Slurs: This includes insulting words and phrases that can be referred to as hate speech. It protects your server members from personally insulting words that may be targeted at them.
Sexual Contents: This includes words or phrases that refer to sexually explicit activities or behaviors. It helps in dealing with sexually explicit language from your server.
You can also add words or phrases that other users can use on the server by clicking on the Allow words and phrases option.
Choose your desired response for AutoMod when they see these harmful messages. You can choose the Block Message and Send Alert options.
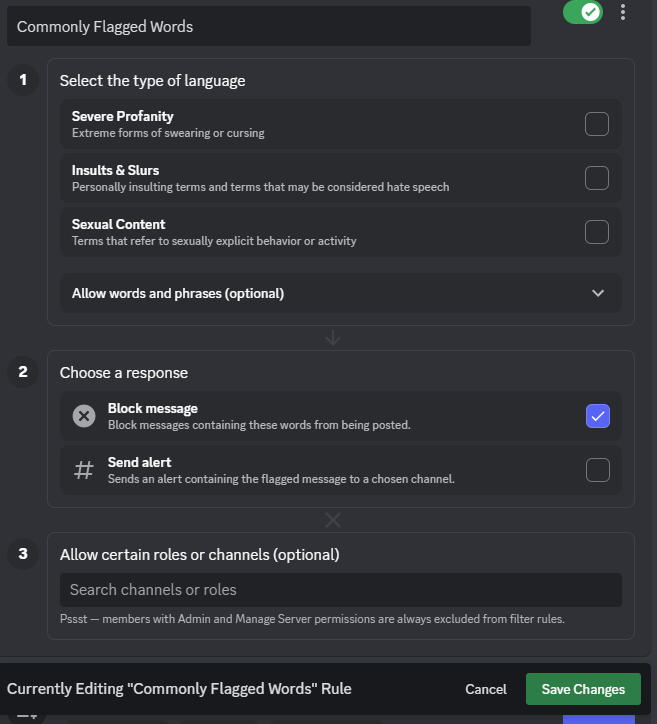
Click on Save Changes once you're done with this setting.
Step 2: Create a Custom Keyword Rule
Click on Create beside the custom keyword rule option.

On the window that appears next, you have the ability to choose your own content filters by entering your own keywords. As a moderator, you also have the ability to ban NSFW content in your communities.
You have the option of how you want AutoMod to deal with these messages by blocking the messages, sending you alerts, and giving users a timeout.
Click on Save Changes to update your settings.
These settings allow communities, friends, and new users to connect and chat effectively with each other on the server and help in content moderation or help whoever is in charge of moderating the server.
Moderation Discord Bots
As a server admin or moderator, you can use a Discord moderation bot to manage server content. Discord moderation bots can help you organize your servers, function as welcome bots for new users, and perform as an anti-spambot for destructive users.
Suppose you want to keep your server safe without you acting as a moderator, in that case, you can add a moderation bot to your Discord server.
There are different bots available currently and they all have different features and strengths. Examples of these moderation bots include MEE6, Dyno, ProBot, Tatsu, and Arcane. You can check any of these Discord Moderation bots out to compare and determine which one aligns with your server moderation needs.